This next blog comes from Carys Mainprize, Education and Communications Officer at the Crichton Carbon Centre, one of our partners delivering the Solway Coast Marine Project.
As the education officer for an environmental organisation, with both science and arts at its core, I’m always asking myself how I can make learning engaging and fun. I work largely with young people in schools, with the hardest audience being the early secondary school – where pupils are learning in usually quite rigid environments where the curiosity and playfulness in primary school has been left behind due to time constraints, and are not yet usually invested in their own learning because there’s little agency over what subjects they choose. How do I catch the attention of that age group, who already have so many demands of them?
Whenever I design something educational, I try to include at least one ‘c’ at all times (we like our Cs at Crichton Carbon Centre). Those are Challenge, Creativity, or Curiosity. If I want a 45 minute period where pupils are going to take away some interest in the broadness of possibilities in marine science, I need to use those Cs as much as possible.
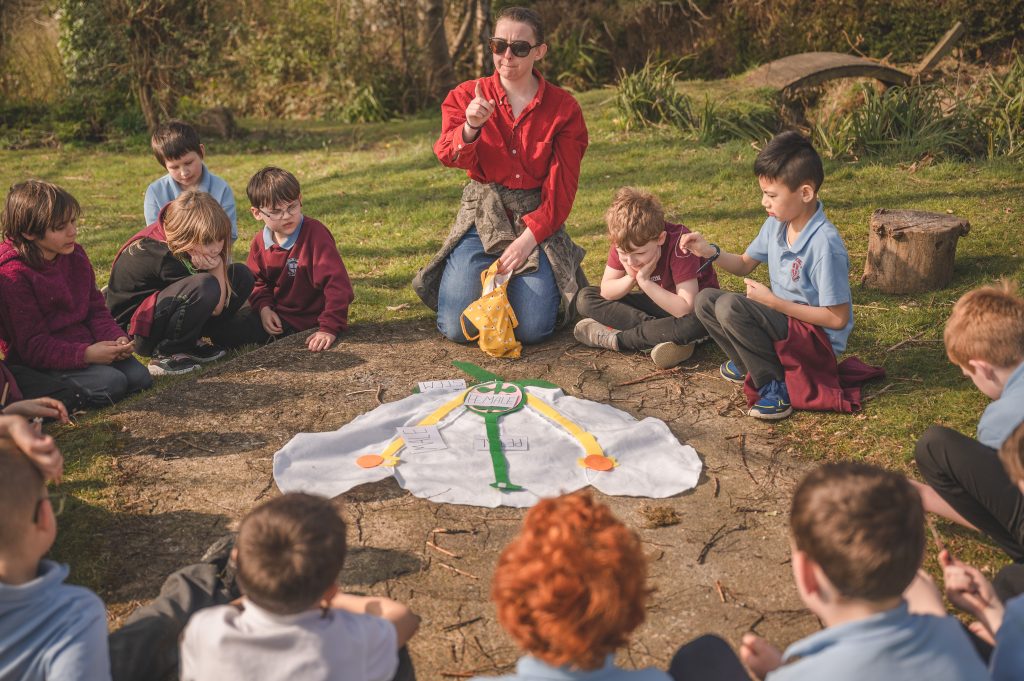
Thus was born one of the three activities in this Introduction to Marine Science lesson. How can pupils see what the inside of marine animals look like as if they’re doing a dissection – without the loss of life and without me sourcing the animals? Can I create a visually interesting object, that is interactive and tactile, which gives pupils the experience of an animal they’re unlikely to get their hands on (unless they do marine biology or a related university degree!).
The idea of a sea urchin mock dissection was born. I have some sewing skills, secondhand fabric is easy to come by, and there’s a reason that plushies are forever popular. I chose a sea urchin because it’s one of those recognisable and known creatures, even if a lot of people have never seen one in real life.
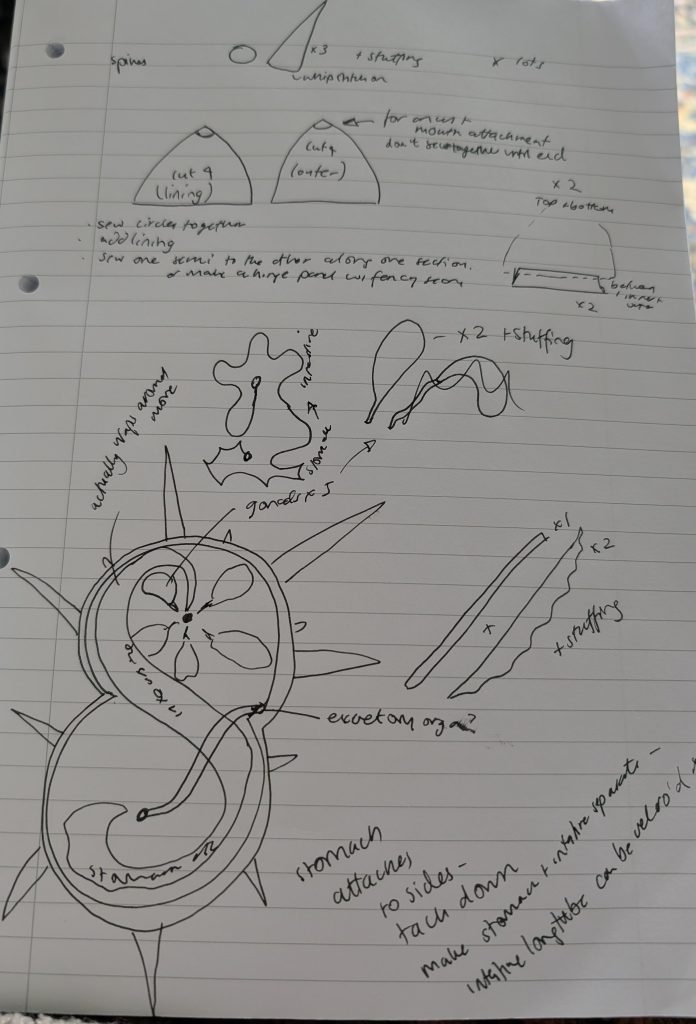
I quickly realised that creating one was harder than I first thought, which is usually the way with sewing projects. I wasn’t deterred – after a few iterations of a half dome (including trying to create a wire frame) I settled on using recycled stuffing to create some volume rather than have a flat surface.
A quick note here on the symmetry of a sea urchin. Yes, symmetry! Symmetry is very important and useful as a way to help us group living things together in taxonomic groups, and can help us understand the path of evolution. Echinoderms, which sea urchins, starfish, and sea cucumbers belong to, all have radial symmetry (although their larvae first have bilateral symmetry – which tells us that they evolved from an ancestor with bilateral symmetry!). Humans have bilateral symmetry – a left and a right half. Sewing something that opens radially is a lot harder than sewing something with two halves, so this sea urchin looks a little like a bivalve (so named because of its bilateral symmetry, with well known members of the group like mussels, oysters, and clams). That was something I had to accept – and luckily, once I added on the spines and painted the water vascular system on, I think it becomes more obvious that it is a sea urchin and has more complicated symmetry than we do!
There were a few changes as the process went on. Originally I had left open a small circle in the middle of each dome, with the idea that I could sew the mouth and intestines to either end and create a true tube through the sea urchin. I closed the hole in one dome, and avoided creating it in the other – it was just not working. The axial organ, which takes waste from the vascular system out of the body, was originally a stuffed creation much like the gonads but when I looked at anatomical illustrations again I realised it wasn’t long enough for what I needed it to do – attach at both ends of the shell, essentially. Instead I picked out a discarded bit of secondhand fabric which had elastic already encased, and used that – which means the dome can still open and close unimpeded, and it’s another bit of tactile interest.
If I remake this model, I’ll use sturdier fabric to allow me to attach Velcro onto all the pieces, allowing pupils to truly dissect the sea urchin and put it back together. For now, I’m chuffed! I think this is something that can go along to SCAMP events with children and adults alike – whenever I’ve mentioned this project, people are suddenly very interested in sea urchin anatomy, which is exactly the goal!
At the start of this blog I mentioned there were three activities. Looking at sea urchin anatomy (and trying to name the pieces based on clues) is one. Pupils will also be trying to name sounds recorded underwater from a list of answers (matching them correctly for points), and I am working on 3D printing marine and coastal species or skulls for pupils to be able to pick up and look at. I hope they leave that activity realising the biodiversity of our marine world is truly awe-inspiring.
If you’re a teacher or home educator reading this and would like us to test this lesson with your pupils, ideally S1-S3, please get in touch with Carys at c.mainprize@carboncentre.org
The Crichton Carbon Centre is a not-for-profit based in Dumfries and Galloway, working across Southwest Scotland and beyond to keep carbon where it belongs. We focus on practical rural climate solutions, working on peatland restoration projects and delivering peatland restoration training, ecological management, socioecological art, and environmental education. www.carboncentre.org